Opening an Image or Video File
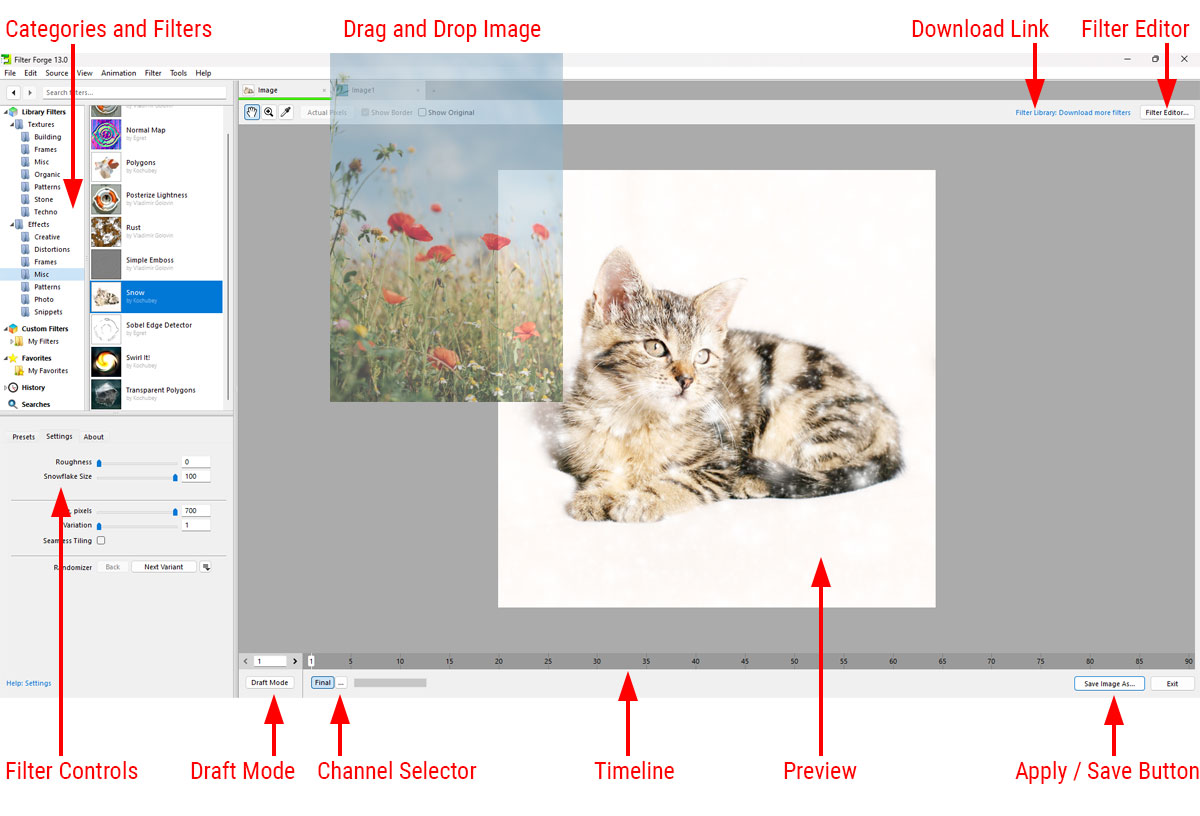
To load an image file to be processed with filters, drag and drop it into the Main Window or select Source > Open Image... from the menu.
You can also load a video file or an image sequence – all sequentially named files in a single folder – by selecting Source > Open Video or Sequence... After you load a video or an image sequence and select a filter, you'll be able to see each frame preview on the Timeline.
To apply the filter to a single image, click the Apply / Save Image As button or select File > Save Image As. To apply a filter to all video frames or images in a sequence, select File > Render Animation. Note: the Render Animation command is only available in the Studio Edition: the junior editions can still save each frame one by one via the Save Image As command.
Apply / Save Image As Button
The Apply / Save Image As... button saves the result produced by a filter. When Filter Forge is running as a plugin, the Apply button sends the resulting image to the host application. In the standalone mode, the Apply button is replaced by the Save Image As... button which saves the rendered image as a graphic file. On some systems, the Apply / Save Image As... button may be hidden under the system taskbar. To fix this, resize the window so that the button becomes visible.
Categories and Filters
This area contains the list of pre-installed filters and filters downloaded from the Filter Library. The filters are combined into categories which fall into several main groups: Texture filters which generate textures and don't need a source image, Effect filters which modify an existing source image, the Custom Filters category which stores filters made by you, Favorites, History of recently-used filters, and your recent Searches. Here's what you need to know about Categories and Filters:
- To quickly select a filter by name, switch to the filter list and repeatedly press the key corresponding to the first letter of the filter name.
- To add a filter to Favorites, choose Filter > Add to Favorites from the menu.
- To delete a filter or a Favorite, press the Del key.
- Deleting pre-installed and downloaded filters can be rolled back – you can always download them again.
- Deleting a filter from Custom Filters is not reversible – the filter will be deleted permanently.
- Deleting a filter from Favorites deletes the shortcut only and does not delete the filter itself.
- For more info on this area, see Filter Manager.
Filter Controls
Filter Controls is a tabbed area allowing users to adjust filter settings, save or restore presets of these settings, adjust the lighting and view the information about the filter.
- The Presets tab allows you to save and apply presets ('snapshots' of filter settings).
- The Settings tab lets you adjust and randomize filter settings.
- The Lighting tab controls the lighting (it is available only for filters that support it).
- The About tab shows filter information, author, popularity data and a link to the filter's web page.
Preview
This area lets you preview the image generated by a filter. Here's what you need to know about the Preview area:
- To pan the preview, hold and drag the right mouse button; or, when the preview cursor is in the Hand mode
 , hold and drag the left mouse button.
 - To zoom the Preview in and out, use the mouse wheel.
- You can also switch to the Zoom cursor
 . In this mode, click to zoom in and Alt⌥-click to zoom out.
 - Clicking the Actual Pixels button sets the zoom level to 1:1 so that the image pixels correspond to screen pixels directly.
- If you want a particular image region to be rendered faster, zoom in on that region – the renderer will put a higher priority on it.
- The Show Border checkbox allows you to see the image border on a seamlessly tiled filter.
- The Show Original checkbox is useful for comparing the filter result to the original unmodified image.
- The preview size can be reduced to make rendering faster – choose View > Preview Size > Reduced from the menu.
- The preview is automatically reduced for large images. This can be turned off in Interface Options.
Channel Selector
The list of small buttons at the bottom of the screen is the Channel selector: it allows you to render a special texture channel, or map, to be used in 3D packages and game engines. The default channel is Final which shows the final resulting image.
The list of channels can be configured in the Configure Channels dialog: if you are not interested in exporting maps for 3D modeling you can uncheck all channels except Final. See Configure Channels Dialog for more information.
Draft Mode Button
When Draft Mode is enabled, the preview image is rendered as draft: it offers excellent preview speed while sacrificing a bit of quality. Note it only affects the preview, the final image will be rendered at full quality.
Here is the full list of changes applied in Draft Mode.
- Anti-aliasing is set to Off, Edges Only, Jitter off.
- Input cache settings for all bitmap-based components in the filter are set to minimum.
- Occlusion Quality settings on the Lighting tab are set to Draft.
- Preview size is set to Reduced.
Download Link
The download link above the preview lets you download filters from the Filter Library, an online repository of user-created filters to which anyone can contribute. All filters in the Library are free to download and use. For more info on downloading filters, see Filter Library.
Filter Editor
The Filter Editor button opens the Filter Editor, a visual node-based environment where you can build custom filters by connecting components into a network. All filters in Filter Forge were made in the Filter Editor and are fully editable.
- To edit an existing filter in the Filter Editor, press Ctrl⌘+E, or click the Filter Editor... button and choose Edit this filter.
- To create a new filter from scratch, press Ctrl⌘+N, or click the Filter Editor... button and choose Create a new filter.
- All user-created filters are saved to the default folder in Custom Filters (usually My Filters).
- Downloaded and pre-installed filters cannot be modified directly. When you edit them, the Filter Editor creates a copy in Custom Filters.
Other Tasks
- You can configure Filter Forge to show elapsed rendering time. See Show elapsed rendering time in Rendering Options.
- To locate the filter file (.ffxml), select the filter and press Ctrl⌘+L or choose Filter > Locate File from the menu.
- To enter your License Key or change your licensing information, choose Help > Enter License Key from the menu.
- To check for the availability of updates to the Filter Forge software, choose Tools > Updates from the menu.
- To adjust anti-aliasing settings for the currently selected filter, use the Anti-Aliasing Menu.
- To render normal, diffuse, bump and other maps, use the Render Channels Menu.
- To download updates for Filter Library filters, use the Filter Updates dialog.
- To submit filters you created to the Filter Library, use the Submit Wizard.
- For more information about the Main Window interface, see Main Window Menu and Hotkeys.