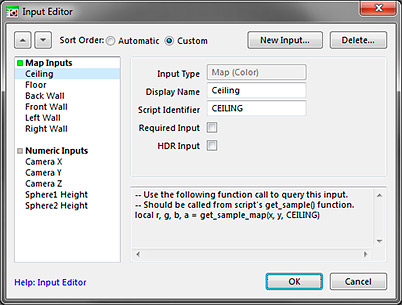
The Input Editor dialog lets you add, delete or edit inputs of a Map Script or a Curve Script component. When added, the inputs become connectable and adjustable in the Filter Editor and available to the script, where they can be queried by appropriate functions described in Referencing Inputs from Scripts. The dialog is accessible via the Input Editor button on the Inputs tab in the properties of Map Script and Curve Script components.
Adding Inputs
Inputs are added via the New Inputbutton at the top of the dialog. When you click the button, it shows a dialog allowing you to enter the name and specify the type of the new input:
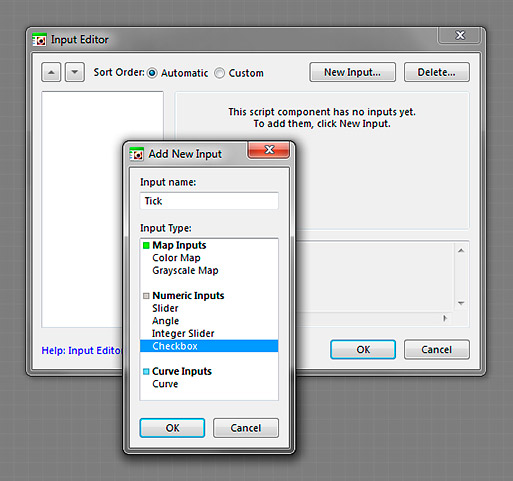
You can add inputs of the following types:
- Color Map Inputs
- Grayscale Map Inputs
- Slider Inputs
- Angle Inputs
- Integer Slider Inputs
- Checkbox Inputs
Configuring Inputs
Each input has settings that can be adjusted. Some of these settings are available to all input types, while some are type-specific. To adjust the settings for a particular input, select it in the list. The following settings are available:
Display Name (for all inputs)
Specifies the display name for the input. It is used for display purposes only, it is not used for referencing the input from the script, so it can contain spaces and hyphens. This setting is available for all inputs.
Script Identifier (for all inputs)
This is the most important setting: it specifies the script identifier for the input. A script identifier is used for referencing the input from the script, in the manner shown by the code snippet below the input settings area. The script identifier must be uppercase, it cannot contain spaces or hyphens, and it must not begin with a digit or underscore. This setting is available for all inputs.
Required Input
Marks the corresponding input as a Required Input. This setting is available for Color Map, Grayscale Map and Curve inputs only.
HDR Input
Allows the corresponding input to accept HDR colors and values. If this setting is turned off, the input cannot receive HDR colors – if you connect an HDR component to this input, its output color will be automatically clipped into the 0…1 range. This setting is available for Color Map and Grayscale Map inputs only.
Minimum and Maximum Value
These settings specify the minimum and maximum values for the Integer Slider input. They are available for Integer Slider input only.
Errors and Validation
The Input Editor dialog validates the values you enter for all settings (input display names, script identifiers, minimum and maximum values etc.) and when it detects an error, it displays red warning icons indicating the errors and a balloon popup with the information on how to fix the error. You won't be able to complete the dialog by clicking the OK button until all the data you entered successfully pass the validation.
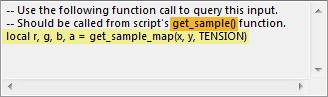
Using the Code Snippet
The code snippet displayed for each input simplifies the task of referencing that input from the script, and it can be pasted directly into the script. The yellow color in the following picture marks the relevant part of the snippet, and the orange color indicates the function of the script where you should paste the snippet:
Deleting Inputs
To delete an input, select it in the list and click the Delete button at the top of the dialog, or press the Del key. Deleting inputs in the Input Editor dialog doesn't remove references to these inputs from the script, so scripts querying deleted inputs will terminate with an error.
Editing Sort Order
The sorting order of the inputs can be edited using the Up/Down buttons on the top of the dialog. By default, the sorting order is set to Automatic, but when you use the buttons, it switches to Custom. Note that the inputs can only be reordered within their class – Map Inputs (green) always come first, followed by Numeric Inputs (gray) and Curve Inputs(blue).