Anti-aliasing is the technical term for elimination of jagged edges in images. In Filter Forge, anti-aliasing settings can be adjusted in the Anti-Aliasing menu. Since Filter Forge uses a sample-based rendering architecture, it implements anti-aliasing by calculating multiple samples per pixel and averaging their RGB channels to produce the resulting pixel color.
Filter Forge's Smart Anti-Aliasing Algorithm
A naive approach to anti-aliasing would be to simply shoot multiple samples for each pixel of the bitmap being rendered, and then average all returned sample colors to produce the final pixels. However, this approach is ineffective when the image consists mostly of solid-colored or smooth areas, which is often the case.
To save rendering time in such cases, Filter Forge uses a smart anti-aliasing algorithm – its components can report solid-colored or smooth areas in their output that don't require anti-aliasing in their interior but need anti-aliasing on their edges. These zones are called anti-aliasing zones or AA Zones. All Filter Forge components report their AA Zones to the renderer. It combines AA Zones from all components into the final AA Zone map and runs it through an edge-finding algorithm which marks pixels lying on the borders between different AA Zones.
You can view AA Zones and AA Edges (the map of pixels marked for anti-aliasing) for any filter in Filter Forge via the commands in the Show Diagnostics sub-menu of the Anti-Aliasing menu.
Anti-Aliasing Zones Explained
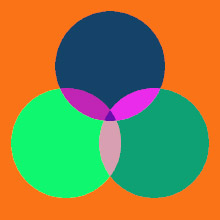
To illustrate how anti-aliasing zones work, we'll use a script that renders three intersecting solid-colored circles on a solid background. This image is shown without anti-aliasing, hence the jagged edges:

Non-Anti-Aliased Image
Obviously, we want all circle edges to be anti-aliased. To achieve this, our script must report different AA Zone values for every solid-colored area in the image. The following example image shows AA Zones that would produce correct anti-aliasing for the picture above. The example shows the zones as colors, but actually they are represented by integer values – Filter Forge converts them to color for visualization only. Note that the script outputs different AA Zones for all sub-areas in the image – for example, each of the three 'petals' of the 'flower' in the center of the image has a different AA Zone value:
AA Zones
The combined map of AA Zones is then run through an edge-finding algorithm that flags pixels lying on the edges between different AA Zones – these pixels will receive multiple samples during the anti-aliasing rendering pass:

AA Edges
The final example below shows the anti-aliased result. When rendering this image, Filter Forge renderer calculated multiple samples only for the pixels marked for anti-aliasing (shown in white in the AA Edges map above), while the rest of image pixels were calculated using a single sample per pixel:

Anti-Aliased Result
Reporting Anti-Aliasing Zones from Scripts
In the Map Script and Curve Script components, zone reporting is done by calculating AA Zones during the execution of script's get_sample() function and returning the AA Zone value as the last optional return value – see the script below. Here's the script we used to render the examples above:
function prepare()
	radius = 0.25
end;

function get_sample(x, y)
	local r, g, b, a = 0,  0, 0, 1
    local aa_zone = 0

	-- Red circle
	if (x-0.5)^2 + (y-0.3)^2 < radius^2 then
		r = 1
		aa_zone = combine_aa_zones(aa_zone, 1)
	end

	-- Green circle
	if (x-0.7)^2 + (y-0.65)^2 < radius^2 then
		g = 1
		aa_zone = combine_aa_zones(aa_zone, 2)
	end

	-- Blue circle
	if (x-0.3)^2 + (y-0.65)^2  < radius^2 then
		b = 1
		aa_zone = combine_aa_zones(aa_zone, 3)
	end

	return r, g, b, a, aa_zone
end;
Let's look at the script, especially at the lines marked with bold.
First, we create a variable named aa_zone and initialize it with zero. Then, as the script execution proceeds further, we determine if the sample coordinates x and y hit a particular circle and combine the original aa_zone value with a new zone value we assigned to that circle. The combination is done by calling the combine_aa_zones() function with two zones as arguments.
Our example script assigns zone value of 0 to the background and values of 1, 2 and 3 to red, green and blue circles respectively, but the final AA Zone map will contain more zone values due to combination of AA Zones in overlapping areas.
When script execution reaches the return statement at the end of the get_sample() function, we arrive at a single zone value that reflects the execution path within this particular call of script's get_sample() function for given sample coordinates. For example, if the sample coordinates x and y hit the background area (i.e. none of the three if operators enter their true branch), aa_zone will remain at 0, the value it got at initialization. But if the sample coordinates hit the overlapping area between red and blue circles, the aa_zone value will be a combination of 0 (background), 1 (red circle) and 3 (blue circle).
Finally, we return the accumulated aa_zone value from script's get_sample() function as the last return value. This return value is optional, so if your script doesn't introduce any edges that need to be anti-aliased, you can safely omit it. See Map Script and Curve Script for more information on get_sample() return values.
The key point of this example script is that you should return a unique AA Zone value for every solid-colored or smooth-colored area that needs anti-aliasing at its edges. Particular AA Zone values don't matter as long as they are different for different image zones – you can replace the 0, 1, 2 and 3 in the script above with any values you want, for example 42, 111, 2222 and 33333 respectively, and the script will still produce correct anti-aliasing. Calling the combine_aa_zones() function is not required – you can combine the zone values using your own formula which could be as simple as just adding them together. Furthermore, even the zone combination approach itself is not mandatory – it is just a way to produce unique AA Zone values for overlapping areas. A lot of patterns don't need zone combination – for example, if your script outputs a checkerboard pattern or a banded gradient, all you need is to return different AA Zone values for every square or gradient band.
combine_aa_zones() Functionn
combine_aa_zones() is just a function that combines two integer* numbers into a third integer* number using their hashes. It's not tied to Filter Forge internals in any way, so its use in scripts is not necessary – you can replace it with any other function or formula that combines two integer values into a single integer value. We provided this function for convenience – it uses hashing, which is difficult to implement in pure Lua because it lacks binary arithmetic operations.
integer3 = combine_aa_zones(integer1, integer2)
- integer3(return value) – The resulting integer* number produced by combining hashes of two arguments of the function, integer1 and integer2.
- integer1 and integer2 – Integer* numbers to be combined into a single number.
* Lua does not support integer numbers, so actually this function accepts two floating-point values and returns a floating-point value. Both arguments are rounded to integers before processing, and the returned value never has a fractional part. Also, this function is implemented using signed 32-bit integers, so any argument value that exceed said capacity will be truncated.
AA Zones and Curve Scripts
Curve Script components can also return AA Zone values from their scripts. Since the concept of 'overlapping zones' makes little sense in context of curves, it is unlikely that a curve script will use the combine_aa_zones() function – you can just return separate AA Zones for linear or smooth segments of the curve, as shown in this example:
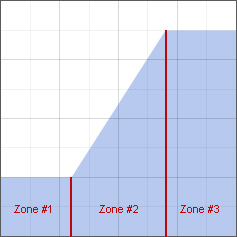
Here's the curve script that implements this example. This example doesn’t calculate or combine any AA Zones, it just returns them as constants (111, 222 and 333) in appropriate branches of the if statement:
function prepare()
	left = 0.3
	right = 0.7
	low = 0.25
	high = 0.875
end;

function get_sample(x, y, t)
	if (t < left) then
		return low, 111
	elseif (t < right)  then

		v = low  + (high-low) * (t-left) / (right-left)
		return  v, 222
	else
		return high, 333
	end
end;
Handling AA Zones from Script Inputs
When your script has map or curve inputs, components connected to them will return their own AA Zones, which should be mixed into the AA Zone map produced by your script. Thankfully, you don't have to deal with this manually – Filter Forge automatically combines AA Zones returned by your script with AA Zones returned by map or curve components connected to script inputs.
This is done as follows: every time a script calls a map or curve input sampling function, the AA Zone value it implicitly returns is remembered by the renderer. When the execution of script's get_sample() function has finished, AA Zones from all map and curve inputs sampled during script execution are combined with the AA Zone returned by the script from its get_sample() function.
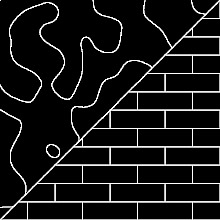
To take full advantage of Filter Forge's automated AA Zone combination algorithm, you should pay attention to the location of input sampling function calls within the script. Consider the following two scripts. Both of them sample two map inputs, A and B, the former being supplied by a high-contrast Perlin Noise and the latter by Bricks. Both scripts generate the same image:
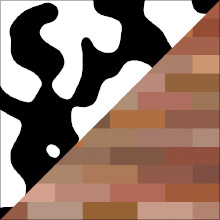
Script #1 (correct sampling order):
function prepare()
end;

function get_sample(x, y)
	if (x+y)/2 < 0.5  then
		r1, g1, b1, a1 = get_sample_map(x, y, A)
		return  r1, g1, b1, a1
	else
		r2, g2, b2, a2 = get_sample_map(x, y, B)
    	return  r2, g2, b2, a2
	end;
end;
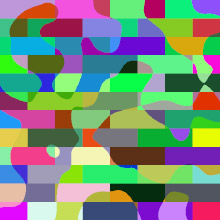
This script samples the inputs selectively, depending on the sample coordinates x and y. Note that AA Zones returned by the input A (high-contrast Perlin Noise) are only visible in the top-left part of the image, and vice versa, the zones returned by the input B (Bricks) are only visible in the bottom-right part. The resulting AA Edge pattern perfectly matches the rendered result given above:
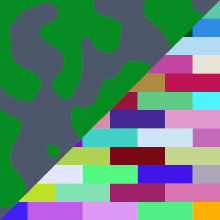
Script #2 (incorrect sampling order):
function prepare()
end;

function get_sample(x, y)
	r1, g1, b1, a1 = get_sample_map(x, y, A)
	r2, g2, b2, a2 = get_sample_map(x, y, B)
	if (x+y)/2 < 0.5 then
		return  r1, g1, b1, a1
	else
		return r2, g2, b2, a2
	end;
end;
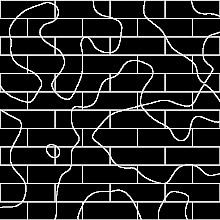
This script always samples both inputs A and B disregarding the sample coordinates x and y, which are used only to return the correct color. As a result, AA Zones from both inputs are mixed across the entire image. The resulting AA Edge pattern doesn't match the rendered result above. Also, the diagonal visible in the rendered result is not visible in AA Zones / AA Edges maps, which will cause jagged edges along it:
The key point of these two examples is that the execution path affects the way Filter Forge combines AA Zones from inputs with AA Zones produced by the script. In the first example, different execution paths within script's get_sample() function lead to different inputs being sampled, which is reflected in resulting AA Zones. In the second example, all execution paths lead to both inputs being sampled so their AA Zones are always mixed together.
Additionally, the first script is considerably faster than the second because it samples inputs only when their returned color is actually used to calculate the final color, while the second script simply discards the results of input sampling for 50% of rendered pixels.