José María Andrés Martín [aka ALZHEM], former CG Lead at Psyop L.A, now CG Supervisor at Riot Games, is telling us how he uses Filter Forge in video production.

The project and the style
When we first knew about this project for Butlins, a chain of holiday camps in the UK, we were all excited as the client wanted for his ad a challenging painterly look quite hard to achieve digitally. This would need an approach different to other projects done in the past, so we started considering Filter Forge as a possibility instead of previously used Photoshop filters.
The directors who brought the magic to this project were Georgia Tribuiani and Paul Kim. Two extremely talented artists who gave their best to get this commercial done. Paul was as well who in the very last step painted over frame by frame the troubled areas giving his personal touch to the film.

Why Filter Forge?
As I mentioned, on previous projects we used Photoshop filters over sequences to achieve painterly looks, but when you use a filter you get what you were offered, no more. So if the filter misbehaves on specific situations there is nothing you can do to change it. This doesn't happen with Filter Forge. In a weird way, Filter Forge is like Nuke inside Photoshop, an extremely versatile node based program that, in this specific case, lets you make filters. But the best part of these filters is you are the one making them, so if the filter doesn't do you what you need you can edit it and replace, tweak or add anything you want.
The only drawback with Filter Forge is it has been designed as a tool to generate stills, and, although you can batch sequences with Photoshop, something like this can be a serious bottleneck when you have to deal with tight deadlines and last minute changes. This was our main concern at the beginning, but after a few tests where our first alpha filter behaved great with some test sequences (even keeping the alpha for further compositions), we decided to create our own Filter Forge render farm.

The R&D and Look Dev processes
One thing that I personally love about Filter Forge is how they conceived their idea of community, based on rewards for those members who actively improve and, one by one, make their already huge filters collection half of what Filter Forge is. This library helps other artists so we don't have to start from scratch every time we need a specific look, and our project wasn’t an exception.
We took little snippets from 4 different filters from the library, and with this base we built and tweaked our way to our first alpha filter. It wasn't perfect, of course, but let us work with a clean alpha channel, so we could run it straight on any EXR we exported out of Maya.
Also, we did our first tests with sequences using this filter. They were quite far from being perfect, but at least gave us a solid lead to what we needed to tackle in order to get to the look we wanted. For these tests we used Photoshop’s batch process.
Also, we did our first tests with sequences using this filter. They were quite far from being perfect, but at least gave us a solid lead to what we needed to tackle in order to get to the look we wanted. For these tests we used Photoshop’s batch process.
The painterly look was on its way, but there was something about color missing at this point. What was it? Our filter is based on Filter Forge's Bomber node and, as you know, the color for the particles is taken from the source. Well... this is not entirely true as you can plug whatever you want there, but we are trying to get a painterly look from 3D renders, not to alter the original colors. So the solution to this problem was tweaking the shader in Maya so we could control independently dark, medium and bright tones and their hues and saturations. This let us have a great control over the color or almost everything on a per object basis.

"FFFarm" and "FFSubmitter"
As I mentioned before Filter Forge is great, but one of the big issues we had is how stills oriented it is. You can process an image sequence in Photoshop, yes, but what if you need to process 12 shots, with several passes per shot, with several versions per pass, and with several filter presets per version? And add a hint of "rush" to the equation. Well, you will agree neither of us would like to be the person behind processing all those thousands of frames, right? So here is where we decided we should write our own Filter Forge render farm.

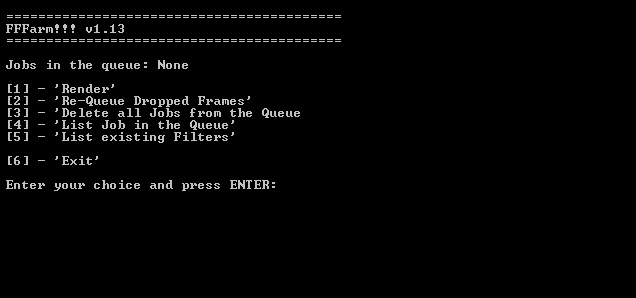
The first version of the farm was called “FFFarm” and was very, very basic. The logic behind it was pretty simple. It processed every image or folder dragged onto the script creating a ".ffxml" with as many tasks as images/frames we were giving, and then run "FFXCmdRenderer-x86-SSE2.exe" with our ".ffxml" file as the argument. This worked alright, but the problem came when you had to cancel it and lose the possibility to resume, having to start from the beginning.
The second version treated all the frames separately, so it created an ".ffxml" file per image. This new way to tackle the problem was the one to follow until the end of the project.
The next versions added other features like queue management, and several options to choose the file format, filter to apply, etc.
"FFFarm" was working fine, but at this point we needed to control manually the different servers running Filter Forge so we decided to write a submitter and use our existing and refined render farm. This was done by taking the ".ffxml" creation part and implementing it into our new "FFSubmitter". A few tests later all was working like a treat. After dragging our single images or sequences onto the script we got a pop up with the presets to choose. It even allowed us to select several presets at once, and after hitting OK, Voilà! Our farm was spitting out processed frames at the speed of light.

The final result
With the farm and the filter working great we only needed to make sure the look was right not just on stills but on the final sequences. This sounds easy, but as many of you know a common problem of painterly effects applied to animations is the "boiling" effect that creates a very annoying flickering. We loved our filter, but sadly it wasn't an exception on producing that nasty effect.
The solution? Well, one of the best things Filter Forge has is the ability to create presets based on the controls the creator of the filter has left out, and this let us create 4 different versions of the filter: two rough ones with different size strokes, one finer and one with very little strokes for the small detailed areas. Then, in Nuke, we mixed these four filters plus the original footage to generate the pre-final version. Why pre-final? Because the very last step was made by Paul Kim, retouching some troubled areas with Photoshop frame by frame, for the entire length of the spot! Crazy... and ingenious!

Final thoughts
Now the project is out of the door and we can say using Filter Forge was 100% the right thing to do. It gave the “painted” look we wanted, but with the right balance so it was ok when applied to sequences. The fact we managed to create the farm was incredible, as it speeded up the filtering process a lot. And now, after this first project where we tested and developed our own "Filter Forge pipeline", we are all ready to rock, so we can use Filter Forge straight away in any project... and we will.
More projects by José María Andrés Martín
I used Filter Forge to define the look of ANNIE: Origins | League of Legends video and that cinematic got a lot of attention.
Jose, thanks for such a detailed and inspiring story!