|
Ramlyn
Ramlyn

|
My Modification Of "Noise Gabor"#2(Snippet) by DJI http://www.filterforge.com/filters/12447.html |
| Posted: September 10, 2014 7:35 am |
Details
E-Mail
|
|
Ramlyn
Ramlyn
|
Great! This is going to be very useful.  |
| Posted: September 10, 2014 7:36 am |
Details
E-Mail
|
|
DJI
Official Bologna Tester

|
Thanx Ramlyn. I really hope your right.  "Art is quite useless." Oscar Wilde |
| Posted: September 10, 2014 8:20 am |
Details
E-Mail
|
|
SpaceRay
SpaceRay

|
I have just found this awesome noise that looks really cool and well done, very interesting textures and curious shapes can be done and great gradients and transparency effects
And it has many sliders to modify it in different ways
And I think that this could be used in some creative ways, will have to see what could be done and how to use it right
When using the seamless tiling I think that you would not notice at all the repeating tiling as it has too many different things to be able to see it as seen here below  |
| Posted: November 5, 2020 6:32 pm |
Details
E-Mail
|
|
SpaceRay
SpaceRay
|
One simple and fast example I have thought is to think, what would this look with images?
Just add a color control to Profile gradient color 1 and you get like hundreds of Lifesaver in a great gradient way mixed  |
| Posted: November 5, 2020 6:39 pm |
Details
E-Mail
|
|
SpaceRay
SpaceRay
|
with the Lifesaver example you can not see that the images are being rotated randomly very well and it gets a good effect that is well done and well mixed together  |
| Posted: November 5, 2020 6:45 pm |
Details
E-Mail
|
|
SpaceRay
SpaceRay
|
but I think that apart of using images, it could be also well as a overlay for other images as it gives a lovely balanced and well done randomization that looks great  |
| Posted: November 5, 2020 6:49 pm |
Details
E-Mail
|
|
SpaceRay
SpaceRay
|
so when you blend the above using Normal blend mode with 50 Opacity with an image you can get this using for example the FF Garlic  |
| Posted: November 5, 2020 6:58 pm |
Details
E-Mail
|
|
SpaceRay
SpaceRay
|
like much the creative artistic gradient blend that you can get easily  |
| Posted: November 5, 2020 7:11 pm |
Details
E-Mail
|
|
SpaceRay
SpaceRay
|
if you change the Particle mode in Bomber to Lighten then you get even more transparency effect and more shapes
The Profile Gradient is Color 1 - White and Color 2 Black  |
| Posted: November 5, 2020 7:20 pm |
Details
E-Mail
|
|
SpaceRay
SpaceRay
|
and if you add some gradient stripes with another Profile gradient you can get this cool stripes combination  |
| Posted: November 5, 2020 8:38 pm |
Details
E-Mail
|
|
SpaceRay
SpaceRay
|
and here is in more detail zoom to really see the effect of the transparency of the stripes  |
| Posted: November 5, 2020 8:41 pm |
Details
E-Mail
|
|
SpaceRay
SpaceRay
|
even more closer to see the nice transparency effect between all the lines  |
| Posted: November 5, 2020 8:42 pm |
Details
E-Mail
|
|
SpaceRay
SpaceRay
|
or circular stripes  |
| Posted: November 5, 2020 9:00 pm |
Details
E-Mail
|
|
SpaceRay
SpaceRay
|
and if wanted to use the above as overlay texture
Here is the Overlay blend mode with Opacity 100  |
| Posted: November 5, 2020 9:08 pm |
Details
E-Mail
|
|
SpaceRay
SpaceRay
|
a more artistic effect is using instead Difference Blend mode BUT the trick is to use then after Invert to get back the original lighting  |
| Posted: November 5, 2020 9:18 pm |
Details
E-Mail
|
|
SpaceRay
SpaceRay
|
and here is in zoom close up detail  |
| Posted: November 5, 2020 9:20 pm |
Details
E-Mail
|
|
SpaceRay
SpaceRay
|
here is even more close with a 5000x5000 size cropped  |
| Posted: November 5, 2020 9:24 pm |
Details
E-Mail
|
|
SpaceRay
SpaceRay
|
| Quote |
|---|
SpaceRay wrote:
or circular stripes |
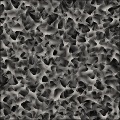
if you go back to the above grayscale example, and just go to the bomber and change it to Difference Particle mode you get this cool dark texture
This is using a 5000x5000 image preview 
|
| Posted: November 5, 2020 9:40 pm |
Details
E-Mail
|
|
SpaceRay
SpaceRay
|
This above could be used for some things
For example again one of them is as overlay image but in this case is used a double image
Take the above result and then use 100 contrast and 100 Gamma and blend it with Color burn, the main image of the window will be too dark, but you can blend it with the original FF window using the "Use transparency" option and blend it with Lighten and 60 Opacity
So this way you change the color of the background wall but not so much the main part  |
| Posted: November 5, 2020 10:00 pm |
Details
E-Mail
|
|
SpaceRay
SpaceRay
|
You can use also the dark black texture in previous post and add much color using an Spectrum to each Color node of the Profile Gradient and then as you get a dark texture in bomber you can use a hue saturation to change the colors
The blend mode is still the same color burn as in last example  |
| Posted: November 5, 2020 10:33 pm |
Details
E-Mail
|
|
SpaceRay
SpaceRay
|
and the above example may not show correctly what texture you really get from the above configuration and can be seen better if you use something with light and white background as the FF Garlic
In this case I had to make an additonal blend mode and use the "Use Transparency" option to make the garlic appear with Linear Dodge blend mode
I forgot to tell that to be able to use the "Use Transparency" you must have activated and enabled the alpha of the color control  |
| Posted: November 5, 2020 11:03 pm |
Details
E-Mail
|