|
SpaceRay
|
||
| Posted: October 28, 2013 5:58 pm | ||
|
SpaceRay
|
WOW!! This is very well done and great Sci-Fi panel, and with many possible variations, like how you have done the designs with beautiful details.
This is great as source for applying some textures after using blend modes. The only bad thing is that as it happens usually with these kind of textures in FF, is very slow, for me a 600x600 takes 15 minutes and when entering the filter editor, it takes 2 minutes two show the thumbnails inside the filter. Although I have to test this again more times. Although the design is good for my taste I think it needs to be more sharpen and more stronger the effect, so I have made some postwork in photoshop, have modified a little with contrast and levels, and then after using 2 adjustment black and white layers, here below is the comparison for you to see the difference  |
|
| Posted: October 28, 2013 6:50 pm | ||
|
SpaceRay
|
Then after I have made 3 panels, each one with the beautiful center sphere modified so I could then use it for the Cuberism Mapped upd ate filter by uberzev (the filter I have used is the one available at the end of first page)
I have used in the filter se ttings blend mode 4 to get this shadows and lighting shown Although on these ones below I am not using the ones shown here above with black and white adjustment layers, just modified the levels and contrast.  |
|
| Posted: October 28, 2013 7:07 pm | ||
|
SpaceRay
|
But the above one looks not realistic without a good lighting, and for this there is two options:
1 - Use the Side (up, left, top) colorness to give different shades of light to the cubes 2 - Modify the lighting in the source already with levels For the example below I have used what is shown on the first post, and also then after have modified the lighting of each one using levels  |
|
| Posted: October 28, 2013 7:29 pm | ||
|
SpaceRay
|
Although these one above looks nice and beautiful as they are, and as mw_marwyn designed them, there can be also an alternative adding an rusted overlay texture
Same as above the lighting is added already to the source image before loading it into the filter and not with the filter shadow settings  |
|
| Posted: October 28, 2013 7:35 pm | ||
|
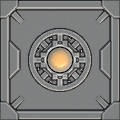
SpaceRay
|
Here is with bigger size to see better the details of the original panel with the rusted texture
 |
|
| Posted: October 28, 2013 7:39 pm | ||
| MKBreuer |
Hy SpaceRay!
Nice to see what Result you create with it. It´s also a greate Idea to use the Uberzev Cuberism Mapped to show how it will works in 3d. If you needs some Noise Masks for the Edges you can use the Edge Mask Filter This Filter is also a little to big and have long rendertimes. The idea was, to get much result as possible, but if you split and contract this filter in the way you needs you will get faster results.  Just simple, but not simpler. (A.E) |
|
| Posted: October 29, 2013 1:14 am | ||
| dactilardesign |
This is an awesome filter that required a huge ammount of job. Thank you for sharing man.
"did you see that? but you knew that already because you are an advanced user" |
|
| Posted: November 14, 2013 10:27 am | ||
|
ceramix4
Posts: 38 |
Hi
For some reason can't run this filter in v5, i imported it but just gray empty canvas. What can be reason ? |
|
| Posted: March 3, 2016 5:16 pm | ||
|
ceramix4
Posts: 38 |
oh wait..though..something finally start to appear
Most slowly opening filter what i've seen yet. He start to render after approximately several minutes after click to it (Its no bug ?) Maybe it somewhat can be optimized ? But anyway tnx. |
|
| Posted: March 3, 2016 5:28 pm | ||
Join Our Community!
Filter Forge has a thriving, vibrant, knowledgeable user community. Feel free to join us and have fun!
33,826 Registered Users
+6 new in 30 days!
153,745 Posts
+13 new in 30 days!
15,385 Topics
+44 new in year!
Online Users Last minute:
16 unregistered users.
Recent Forum Posts:
- Filter Forge Animator doesn't support FF15 filters? by FFCreator
yesterday - Ancient Free Packs!! by Shayne
July 20, 2026 - Chaos Fields by Rachel Duim
July 17, 2026 - Double Mosaic by Ramlyn by Ramlyn
July 9, 2026 - New awesome TEXT component FF 14 - How to get the most of it? by CFandM
July 8, 2026 - Variable Kaleidoscope by inujima by SpaceRay
July 6, 2026 - Question about Upgrading to newest version by GMM
July 6, 2026 - Guide on how to use texture maps PBR export with Filter Forge for 3D by SpaceRay
June 24, 2026 - PBR work flow...? by SpaceRay
June 24, 2026 - Unleashing creativity art with the help of filter forge 11 by EAdams
June 14, 2026 - FF 11 and FF 12 Studio animations that could maybe be done I think by CFandM
June 8, 2026 - BB - BubbleBlocks by Ramlyn by Ramlyn
June 2, 2026