|
SpaceRay
|
||||||
| Posted: September 27, 2013 10:34 am | ||||||
|
SpaceRay
|
WOW! Thanks very much FF Inc. for the EP (Editor´s Pick) reward, this is my first EP!!!
I have been working in this filter many hours along many days and thinking much how to combine and make all the features and options, and how to solve the problems along the way that arised, but after much work and then lots of testing all the options and possible combinations to see that everything works as expected finally I have finished it, and I feel that the EP is great reward for all my work in this filter. This version of the filter is the extended version of the much more simpler version Alphabet Texture Creator by SpaceRay If you feel and think that this version has too much controls, and is too complex please try the other version that has much less controls and options, and will work much better with the "next variant" button than this one. I will put here the full instructions on how to use this filter in the best way and get the most out of it. And some important notes to be aware of. Also some examples to show what can be done. |
|||||
| Posted: September 27, 2013 10:43 am | ||||||
CFandM
 |
Very nice SR and way to go on that EP...
Stupid things happen to computers for stupid reasons at stupid times! |
|||||
| Posted: September 27, 2013 10:45 am | ||||||
|
SpaceRay
|
Thanks CFandM and thanks to you for the Shape of Things filter and also for the Shapes
THANKS TO THE AUTHORS OF THIS FILTERS First of all I must give a very big thanks to: ThreeDee and his excellent letters fr om TD Europa Sans Caps Proc Font with his hard work and great idea to make this fonts as shapes, he has allowed to have letters inside FF something much requested but not possible until he made them. Skybase and his Gradient Circles where I learnt how to give shading to letters and be able to have good results when mixing shapes in bomber and how to make the colorize CFandM and his Shape of Things where he has done a very good and well done work finding the way to use a clever masking using the bomber and fill the mask with lots of shapes and be able to configure and customize them in a great way CFandM and his excellent and well done Working on Shapes Tutorial wh ere I learn many things about how to use shapes inside FF and so I could understand how to use this letters as shapes in this filter. Also Thanks to Skybase for his help in many other threads that he helped me to solve things and I could be able to learn and reach this point of making this filter Now please, read the following post for the instructions, thanks |
|||||
| Posted: September 27, 2013 12:41 pm | ||||||
|
SpaceRay
|
INSTRUCTIONS ON HOW TO USE THIS FILTER AND GET THE MOST OUT OF IT
PART 1 GRAPHIC REPRESENTATION OF SETTINGS I have made this screenshot of all the settings included explaining the most important ones and putting notes together with each one so you can know easily what the control are for and how to use them better. See next post for more instructions  |
|||||
| Posted: September 28, 2013 12:56 am | ||||||
Skybase
 |
[Removed all the suggestions here: because... what am I saying... it's your filter.]
|
|||||
| Posted: September 28, 2013 1:47 am | ||||||
|
Skybase
|
Nice work.
|
|||||
| Posted: September 28, 2013 1:51 am | ||||||
|
SpaceRay
|
Thanks Skybase, you can suggest anything you want and if you know betters ways to do something or optimize any part of the filter.
Later will put examples of creations done with this filter INSTRUCTIONS ON HOW TO USE THIS FILTER AND GET THE MOST OUT OF IT Please, see first the above part 1 with the screenshot of the settings PART 2 - EXPLAINING HOW IT WORKS I made this filter for making typographic textures (as shown on presets 3,7,8 or 9) or converting images into typographic artistic creations based on source colors I think that the best way and easier way to first experiment and use this filter is to load an image as "MAIN" (this is the default) and then choose different presets excluding 3,7,8 and 9) and your image will replace the preset image and convert it into the typographic creations. You can combine this also if you want with Masking and also with Plain colors, see below. Also as experiment you can load a preset and then active masking and/or plain colors option and see what result you get. You can also combine two images using one for source of colors, and another loaded as foreground to be mixed with the opacity and blend modes over the typographic result, see below for more details about this. This can be used also to add a texture effect over the typographic result, see below for more details. You can use the Foreground to colorize the result unloading the tint color and choosing a color Or you can combine all 3, Main + Masking + Plain colors (see below for more details) This filter gives you full control with lots of controls and a great amount of possible different combinations that will give many different results and I invite you to test many different settings and experiment with different sources. You can also use masking for making typhographic shape designs. BASIC CORE This filter works by selecting 5 Letters from the 25 available in 5 groups, so you can go to the about tab and see how the letters are grouped in each of the 5 groups and then sel ect the one you want. LETTERS ORGANIZED AS GROUPS​​ In the about tab I have put this letters table so you can know more easily how to choose the letters inside the filter ​​1 - 1A 2B 3C 4D 5E ​​2 - 1F 2G 3H 4I 5J ​​3 - 1K 2L 3M 4N 5O​​ 4 - 1P 2Q 3R 4S 5T ​​5 - 1U 2V 3Y 4X 5Z​​ Now in this extended version there is many controls to customize the size, opacity, rotation, position, distribution, amount, color, etc. 8 DIFFERENT POSSIBLE RESULTS In the Original version Alphabet Texture Creator you only have 2 way for getting results (the 1st one and 4th shown below), and in this extended version there is 6 ways 1 - EXTERNAL IMAGE - Using External images loaded through main or tint color will use the source color to paint the colors of the letters 2 - PLAIN COLORS - You can paint each one of the 5 letters with one color, so you can choose 5 colors, or make all the same, as you want. 3 - EXTERNAL IMAGE + PLAIN COLORS - You can also combine the External image with the plain colors and tint the result. 4 - MASKING USING BLACK BACKGROUND - You can load any external image that could have an surrounding black background, and this will be considered as a mask, and then none of the letters will fill this black space 5 - MASKING USING BLACK BACKGROUND AND PLAIN COLORS Same as 4 activating the plain colors, this would good for using over black and white images as source. 6 - EXTERNAL IMAGE + MASKING WITH EXTERNAL SOURCE IMAGE To be able to use this you have to load an external image (either main or tint color) and then go to the MASK CONTROL part and "Activate Masking", you have to load another external image as the mask, it must have a transparent background to work. Also you can invert the mask to get the inversal result of the mask 7 - PLAIN COLORS + MASKING WITH EXTERNAL SOURCE IMAGE Is the same as number 5 but instead of loading an external image, you have to unload anyone loaded, and go to PLAIN COLORS part and activate it and then go "Activate Masking" 8 - EXTERNAL IMAGE + PLAIN COLORS + MASKING WITH EXTERNAL IMAGE You can combine point 5 and 6 to get another different result, load the external image, activate plain colors and then activate masking. 3 WAYS OF IMAGE INPUT, PLAIN COLORS AND 2 WAYS FOR MASK IMAGES 1 - MAIN EXTERNAL IMAGEloaded through the menu File--> Open Image.. or using the source loaded from the plugin. 2 - TINT COLOR - Uncheck the Main/Tint Color and load the images in the color control 3 - FOREGROUND TINT COLOR - Choose a color a load an image here if you want. 4 - PLAIN COLORS - To be able to tint with a different color each of the letter groups. 5 - MASK IMAGE - This must have a transparency background to be used as a mask 6 - MASK BACKGROUND - With this you can choose to have a plain color background instead of the default transparent background or also you can any image of your choice as background. MORE DETAILED EXPLANATION 1 - MAIN EXTERNAL IMAGE This way will let you use all the preset available (excluding presets 3,7,8 or 9) because this image will replace any image stored inside the preset and use those settings with the image loaded to create automatically the result. This is the default value so this will let you also use this as a plugin fr om a host software and load the image you have there. The best way and easier way to is to load an image as main and then choose different presets. You can also combine 2 images loading the Although the problem with this is that you can´t save any preset with any image loaded this way, as it will not work as expected, I mean that it will show any built-in image loaded instead, so it will not be shown the real result that you are seeing on preview window, BUT this does not mean that the preset does not work, because if you load again the same source image and you choose this preset, it will give you the same result although is not shown in the preset. To save the result as a preset showing the same result as you see on the preview window you must load the same image through Tint Color and then save the preset 2 - TINT COLOR - Uncheck the Main/Tint Color and load the images in the color control This will work good for storing presets showing the real result that you have got, you can load the image through main image and when you are satisfied with the result, uncheck "Main/Tint Color" and load exactly same image in the Tint Color, and save the preset. 3 - FOREGROUND TINT COLOR You can also combine the main typographic texture with another image overlaid over the result. Two images using one for source of colors, and another loaded as foreground to be mixed with the opacity and blend modes over the typographic result. This could be used to add texturizing to the result, as you load for example a grunge texture and overlay it over the typographic result For this to work right the Opacity must be at value 100 and then if needed reduce it Also you can use the Foreground to colorize the result unloading the tint color and choosing a color and a blend mode 4 - PLAIN COLORS - To be able to tint with a different color each of the letter groups. This is as shown on presets 3, 8 and 9 and as you can see on these presets, the main image is not active and using the Tint color with unloaded image and white color, so then the colors choosen will be kept. You can also activate the main or tint color with a texture to be able to texturize the result or you can combine the result with an image or photo. Also as shown on Preset 3 you can also use the Masking with Plain Colors 5 - MASK IMAGE - This must have a transparency background to be used as a mask See the above screenshot of the setting for the description of this one |
|||||
| Posted: September 28, 2013 4:10 am | ||||||
|
Sphinx.
|
Thumbs up! Also on the documentation effort, which is unseen at this level
|
|||||
| Posted: September 29, 2013 7:47 am | ||||||
|
SpaceRay
|
Thanks Sphinx and also for the documentation comment. I want that anyone could understand and use this filter in the best way and knowing how it works, and what can be done, and the possible things you can do.
Later will put examples of creations done with this filter See also later on next post how to make FRAMES with this filter and put images inside INSTRUCTIONS ON HOW TO USE THIS FILTER AND GET THE MOST OUT OF IT PART 3 - EXAMPLES OF USING THIS FILTER PRESETS AND FIND HIDDEN ONES I will put here some example of using this filter in some ways that I have seen and ideas to be used here, to know what I want to explain, see the image attached at the end of this post TWO WAYS TO USE THE PRESETS There are two way to use the presets 1 - Choose a preset and modify the setting having the saved settings as base source, as it happens with other filters 2 - Follow the below suggestion to find more presets that are hidden than I have also made There are more than 20 presets available, see why below Filter Forge does not allow to have more than 20 presets, but in this filter I have been able to carefully create the presets and configure and customize them so you can have more than 20 presets activating others parts of the filter. One examples is Preset 3 that is exactly the same than Preset 9, but as you can see both look very different and you would not guess that it the same, well the same may happen with other presets too. How to find the other hidden presets? As said there are more presets hidden, and to be able to find them you can do the following steps, and if find one that you like you can it as a preset and keep it. There are different ways to do it 1 - Choose any preset you want 2 - Activate Plain Color checkbox ( or deactivate it if it is already active) 3 - Activate Masking checkbox (or deactivate masking if active) 4 - Activate Invert Mask checkbox 5 - Deactivate plain colors In points 3 or 4 you can also choose if you want to activate the Mask Background to see better the letters
You can of course change also the order of the above and activate first the masking, invert mask and then after the plain colors, as this is just an example. Also I suggest that the first time, you use the default images of the presets to see how the look, and store the presets that you may like, and then you can load your own images as main and try these same steps again. Another way to do this if you want to see the true colors of the "Plain Colors" is to unload any image loaded, as the Main is the default you can go to "File--> New Image and make it plain white, or you can change to "Tint color" unchecking the Main checkbox and unload the color control to white, And if instead of plain white and still you want to use the "Plain colors" and want to keep the original colors you have choosen, is recommended to use use lighten images that have light colors (yellow, light blue...) instead of dark colors, because the plain colors will be mixed with the original source colors below. I can´t use the blend modes to mix this plain colors with the others because all of this is done inside the bomber component. After trying the default Lifesaver mask you can also try your own image masks, see next post of part 4 to know more about this. Also after trying this steps and see what happens you can also try and experiment to modify the result before going to next step. I mean to use the following most important settings that have more impact in the final result: 1 - Scale 2 - Density 3 - Simplify Design 4 - Letters Amount 5 - Letters Multiplier 6 - Letters Opacity 7 - Size Chaos And as you may know already from any other filter is also good to try "Size, Pixels" to reduce or enlarge the global result. Also use the Global "Variation" that you give you lots of different result while keeping the same settings. Sorry that using the "next variant" button gives mostly bad results, but it was impossible to make it work right with so many controls available and having all the freedom that you have in this filter, this is one of the reasons I have made this extended version VS the simple version. Here below is the graphical view of how a preset can change much when activating other options in the filter having all the same preset and same settings Here is the original Preset 6 and how is changed below by just activating some checkboxes 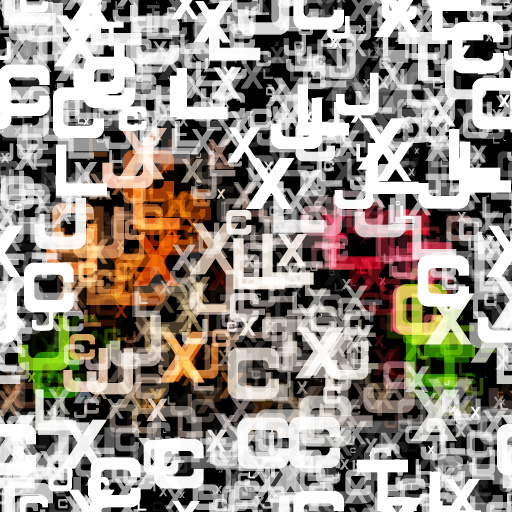
Stay tuned for the Part 4 of instructions on how use better the masking and be able to make Frames or make Letters filled with Letters  |
|||||
| Posted: September 30, 2013 4:10 am | ||||||
|
SpaceRay
|
Do not miss the first 3 parts above
INSTRUCTIONS ON HOW TO USE THIS FILTER AND GET THE MOST OUT OF IT PART 4 - MAKING FRAMES WITH AND WITHOUT MASKING One alternative use of this filter in making full screen textures, is also to be able to make typographic frames for your images There are 3 different ways to make a frame with this filter, and both ways have it´s own advantages and disadvantages. 1 - WITHOUT MASKING ACTIVE - Using a black and white frame loaded into main (not for tint color) without using the masking option activated 2 - WITH MASKING ACTIVE - Using a mask loaded into the color control of the masking part and activating masking Advantages and disadvantages of this 2 ways Using number 1 Use any presets directly but will not have transparency and must load any color if wanted with the mask. This way will let you load a black and white or colorful frame mask that you have made beofre into Main image and then you can choose any of the presets (excluding 3, 8 and 9) to fill this frame mask with letters, loading just once the mask image you can test the presets that you want and see if it works well or not and if it looks as you would like and then you can further modify it with the settings. As said this way you can´t have a transparent background even if you load a mask with already transparent background Using number 2 Can have a transparent background and can use any main image loaded as source colors but can´t use the presets directly as above. This way is useful for filling the mask (or the inverted mask) with the source colors of any main image you could load (or also in the tint color) and does not need to be added to the mask as in way 1, and activating the mask you get a transparent background This way uses an independent mask fr om the main image and it does not matter what colors are inside the mask, the filter will ONLY take the shape of the mask. This way will NOT let you choose the presets and test how it looks as in number 1, because the mask will be deleted each time you double click on a preset, so for this one, you will need to choose a preset and each time activate masking and load the mask into the color control. There is a workaround to this, and is to recreate all the presets with the masking already active and the mask loaded already, so this way each time you choose any of these new presets it will work directly and inmediately without having to load any mask. 1 - FRAMES WITHOUT ACTIVATING MASKING This can also separated in two parts 1 - Black and white source 2 - Colorful source Here below in this post is the black and white source, and on the next post is the colorful source 1 - Black and white source Considering that the filter will only distribute the letters over light colors and will decrease with darker color, and will not put any letter over black, you can design your own graphic frames with pure black and white, putting black wh ere you do not want any letter, so the size and width of the frame is the white part. This is loaded the mask in the main image and does not need to activate masking to work, only load your black and white frame design and choose a preset (excluding presets 3 and 15 and on presets 8 and 9 you must activate main if you are not using tint color). You can also load the mask in the tint color, but you will not be able to change to another preset. One reason to make it this way instead of using masking is that you can keep a black background behind the frame so is not transparent, and also you can do it from photoshop (or any other similar host) without having to save and load the frame Here below is an example I have done using plain colors instead of image source colors and also using a black and white mask  |
|||||
| Posted: October 1, 2013 2:49 am | ||||||
|
SpaceRay
|
Here is the second part of the first part of the above post
2 - Colorful source Here instead of using a plain white frame with black background, I have painted this stripes so they will be used to paint the letters ----------------------- Stay tuned for the second part of the instructions for using a mask activating the masking  |
|||||
| Posted: October 4, 2013 12:10 pm | ||||||
|
Skybase
|
Nice!
Here's a super fun, super challenge. Based on what you already have with the type face generation (observe how ThreeDee put it all together), generate a serif font with adjustable parameters.  |
|||||
| Posted: October 4, 2013 11:56 pm | ||||||
|
SpaceRay
|
I have seen that the Individual rotation does not work always right, and many times the letters are cut, and I having seen what may be wrong, I think I found the problem, and is that Threedee have used the "Free Rectangle" component to make the letters, and they have the feature of going out of bounds, so when you rotate the letter it goes out of the boundary of the shape and gets cut. I will try to fix it. Sorry.
Good challenge but the problem is that I do not like most of the Serif letters if it is going to be used in an artistic and graphical way, like for example in this filter, or to make typography art. Second part of making frames with MASKING ACTIVATED INSTRUCTIONS These are going to be put next week, sorry for the delay |
|||||
| Posted: October 12, 2013 11:25 am | ||||||
|
Skybase
|
You're just finding excuses not to do it. Designers don't stop. Never stop. Anywhere. |
|||||
| Posted: October 12, 2013 11:32 am | ||||||
|
SpaceRay
|
I have been busy making an update that will let you make seamless textures, and also add textures to the inside of the letters.
Also making an alternative version for not only using the internal fonts Be able to use ANY FONT with Alphabet Texture Creator Extended filter
Well, In this case is not an excuse, is that is real that I do not like any serif letters for artistic work, I like any other artistic font but not serif ones, at least for this kind of artwork, as I find them not good looking from my point of view, again only for artistic work.
OH!! YES!!! YES!!! I totally agree, I do not stop, My neurologist have told me that I am a Workaholic and that I can never stop doing things on the computer, and only stop for eating, sleep, bath, and going shopping for food, that I should ALSO DO OTHER things apart from design, art and computer. The only thing I do is go to cinema, and sometimes although few watch TV. |
|||||
| Posted: October 24, 2013 3:12 pm | ||||||
|
Skybase
|
lol well ok, I meant that a sneakish taunt to just challenge/push your abilities. Sounded like a worthy challenge honestly that'd help.
|
|||||
| Posted: October 25, 2013 2:13 am | ||||||
|
SpaceRay
|
Here is one example I have made that I still have put none on this thread
I am open to some possible challenge and thank that you could suggest one, and it sounds good, but it must be something that I would like to do and have some motivation to do it, and get something I want or would be useful to have. |
|||||
| Posted: October 26, 2013 5:00 am | ||||||
|
Bojan Zivkovic
Posts: 1 |
Excellent filter, thank you very much for creating it.
Bojan Zivkovic |
|||||
| Posted: November 2, 2013 1:58 pm | ||||||
|
SpaceRay
|
Thanks very much for your comment and glad that you like it and found it excellent I am thinking in way to make it even better and optimize it in some way, and I am making a new update to include filling letters with images, and another thing more. Also I am thinking to make alternative versions with this filter: 1 - Make this filter with seamless tiling, as it now is now possible to use this tiling but if I remove some parts of the filters and replace them it could perhaps work with seamless tiling 2 - Be able to use any of your chosen font instead of the fixed and only one included in the filter here, and you can see some examples of this alternative here that I am making and still to be finished Be able to use ANY FONT with Alphabet Texture Creator Extended filter 3 - Make this filter with different shapes instead of letters 4 - Make this filter with your own images (with transparent background) instead of letters |
|||||
| Posted: November 6, 2013 10:06 pm | ||||||
|
SpaceRay
|
NEW UPDATE MADE WITH 2 NEW FEATURES
1 - BETTER CATEGORIES SEPARATION I have tried to make a better separation and identification of the different parts of the filter so you can find them easier and better, and have unchecked the checkboxes to avoid confusion of what is really checked on the real filter. IMPORTANT: Be aware that for both of the below features, they are applied over the original colors, so if you want to keep exactly same colors of the stripes, the texture must be plain white, so you have to reduce the "Tint Color amount" to Zero or load a white background image as source. 2 - STRIPES COLORIZING I have updated this filter with a new feature and is to be able to use color stripes made fr om plain colors or from source images to paint the alphabet texture created, you can choose from 2 colors or images up to 5 colors or images to make the stripes, and I have included a fast preview to see stripes BEFORE applying them to alphabet texture, so you really can see customize it as you want and move and position the images wh ere and how you want them. 3 - APPLY TEXTURES WITH IMAGES OR PHOTOS TO INDIVIDUAL LETTERS A second updated feature is that you can now paint the individual letters ALSO with images or photos instead of only plain colors as before, so now it will give you many new ways of using this filters and have many more options for configuring and customizing the colors for each letter instead of colorizing the whole texture To use this , first you have to activate the stripes, and then after activate the stripes preview to see what the preview looks like and configure and customize it with the images you want, when finished and satisfied with the stripes, just uncheck the stripes preview and it will be applied to the alphabet texture |
|||||
| Posted: December 2, 2013 4:51 am | ||||||
EAdams

Posts: 448 |
This is a gorgeous filter, thank you for all the work you put into it!
|
|||||
| Posted: February 27, 2014 12:58 pm | ||||||
|
SpaceRay
|
Thanks EAdams
Thanks to you for using and find it useful and gorgeous |
|||||
| Posted: March 1, 2014 7:38 am | ||||||
|
Peggy Walters
Posts: 2 |
Hi,
This filter is great! Can it be expanded to use words rather than random letters? |
|||||
| Posted: March 5, 2014 8:00 pm | ||||||
|
SpaceRay
|
Thanks, glad you like it Well it could be expanded to use words in two different ways: 1 - USE THREEDEE WAY OF WRITING INSIDE FILTER FORGE The genius of ThreeDee filter forger found and created a way to WRITE WORDS INSIDE filter forge but although is very innovative, amazing and great is not very easy and friendly to use and will take some time to know how to use it to make words, although could be used perhaps to make short words 2 - USE THE ANY FONT ALPHABET TEXTURE CREATOR Another much easier and better alternative would be to use the filter I am making to be able to use ANY font you would want AND also you could load your own words created as a graphic with any font you would like Be able to use ANY FONT with Alphabet Texture Creator Extended filter Sorry that now I am very busy and can´t do it just now |
|||||
| Posted: March 7, 2014 2:09 am | ||||||
|
SpaceRay
|
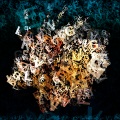
Using the option 2 in previous post I have done this and using the FF Ladybug image for source color This other filter will be available soon  |
|||||
| Posted: March 7, 2014 6:07 pm | ||||||
|
SpaceRay
|
be aware that the example above is NOT made with words created INSIDE filter forge, they are feed to the filter as an PNG image created with tranparent background OUTSIDE of FF, and is the one shown here below
this is a jpeg without transparency as the forum does not support uploading PNG files  |
|||||
| Posted: March 8, 2014 5:23 am | ||||||
|
SpaceRay
|
Well, now that FF 5 has the new bomber plus with unlimited images, I think is time to make a new variation of this filter that will include ALL of the letters at once, and you will not be limited to having to choose only 5 of them,
For this is not needed any batch image loader as the fonts are already done inside FF thanks to the great work of ThreeDee that made my dream true of having letters inside FF, and can not thank him enough And will be easier to use than before I think |
|||||
| Posted: April 3, 2016 12:32 pm | ||||||
|
LexArt
Posts: 256 |
Great work and beautiful examples, like much the typographic effect and textures that you can make with this filter and that it has so many controls and variations, well done
Is deserved well the Editor´s Pick
Yes, this would be interesting to have and use, as having only 5 letters showing may be somewhat limiting the effect, I mean in terms of letter variations |
|||||
| Posted: April 5, 2016 1:10 pm | ||||||
Ramlyn
 |
Then the next step would be using other characters or writing styles as decoration or art.
What about ideograms? Hiragana and katakana? Thai characters? Runes? Ogham? Or maybe invented languages. They all could make very interesting filters. |
|||||
| Posted: April 5, 2016 2:40 pm | ||||||
Join Our Community!
Filter Forge has a thriving, vibrant, knowledgeable user community. Feel free to join us and have fun!
33,826 Registered Users
+7 new in 30 days!
153,744 Posts
+12 new in 30 days!
15,384 Topics
+43 new in year!
Online Users Last minute:
23 unregistered users.
Recent Forum Posts:
- Ancient Free Packs!! by Shayne
July 20, 2026 - Chaos Fields by Rachel Duim
July 17, 2026 - Double Mosaic by Ramlyn by Ramlyn
July 9, 2026 - New awesome TEXT component FF 14 - How to get the most of it? by CFandM
July 8, 2026 - Variable Kaleidoscope by inujima by SpaceRay
July 6, 2026 - Question about Upgrading to newest version by GMM
July 6, 2026 - Guide on how to use texture maps PBR export with Filter Forge for 3D by SpaceRay
June 24, 2026 - PBR work flow...? by SpaceRay
June 24, 2026 - Unleashing creativity art with the help of filter forge 11 by EAdams
June 14, 2026 - FF 11 and FF 12 Studio animations that could maybe be done I think by CFandM
June 8, 2026 - BB - BubbleBlocks by Ramlyn by Ramlyn
June 2, 2026 - Dragon Distort II by Wolfgang Halder by Wolfgang Halder
June 1, 2026