|
SpaceRay
SpaceRay

|
|
| Posted: February 26, 2013 4:48 am |
Details
E-Mail
|
|
SpaceRay
SpaceRay
|
Cool and interesting, beautiful shards effect over the source image, like it much, although I prefer to not use the overlay color cast or the "Saturation overlay" as you call it, I like the pure result.
Like that you can control how much shards will be added or break the image in what level, from a few ones to full and complete shards "explosion" 
Here is one example using preset 9 and reducing to 0 the saturation overlay  |
| Posted: February 26, 2013 4:49 am |
Details
E-Mail
|
|
SpaceRay
SpaceRay
|
Here is another example with another image using preset 9 and reducing to 0 the saturation overlay  |
| Posted: February 27, 2013 4:28 pm |
Details
E-Mail
|
|
SpaceRay
SpaceRay
|
I have just seen that you have been given a EP (Editor´s Pick) Award, congratulations! I think is deserved as is original and well done and it could be perhaps even better as it has more potential.
Kiwi using preset 9 and reducing to 0 the saturation overlay  |
| Posted: February 27, 2013 4:31 pm |
Details
E-Mail
|
|
SpaceRay
SpaceRay
|
Tiger head showing a part of the original
Looking at this example, gives me more ideas of how could this be used and would be good  |
| Posted: February 27, 2013 4:32 pm |
Details
E-Mail
|
|
SpaceRay
SpaceRay
|
Compass explosion showing a part of the original  |
| Posted: February 27, 2013 4:34 pm |
Details
E-Mail
|
|
SpaceRay
SpaceRay
|
As in the Kiwi and Compass, I like how the filter works with the white background and the edges of the original image as seen also here below with this sunflower  |
| Posted: February 27, 2013 4:39 pm |
Details
E-Mail
|
|
SpaceRay
SpaceRay
|
and modifying the settings with the sunflower I got this  |
| Posted: February 27, 2013 4:40 pm |
Details
E-Mail
|
|
SpaceRay
SpaceRay
|
|
| Posted: February 27, 2013 4:44 pm |
Details
E-Mail
|
|
SpaceRay
SpaceRay
|
All the above are square (or nearly square) images and I tried a rectangular image and is curious how it works as you can see here  |
| Posted: February 27, 2013 5:25 pm |
Details
E-Mail
|
|
SpaceRay
SpaceRay
|
And to see it better the above one, here is one part of it in bigger size to see more details  |
| Posted: February 27, 2013 6:40 pm |
Details
E-Mail
|
|
SpaceRay
SpaceRay
|
I have seen that sometimes for reducing the shards size and effect is better to use the "Size, pixels" setting than the "Shards Size" as it gives better result.
Here is a tulip flower  |
| Posted: February 28, 2013 11:32 am |
Details
E-Mail
|
|
SpaceRay
SpaceRay
|
and here the same tulip with different settings and more shards  |
| Posted: February 28, 2013 11:33 am |
Details
E-Mail
|
|
SpaceRay
SpaceRay
|
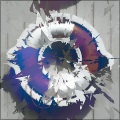
And a red, black and white abstract composition  |
| Posted: February 28, 2013 11:33 am |
Details
E-Mail
|
|
SpaceRay
SpaceRay
|
some stripes  |
| Posted: February 28, 2013 11:35 am |
Details
E-Mail
|
|
SpaceRay
SpaceRay
|
|
| Posted: February 28, 2013 11:36 am |
Details
E-Mail
|
|
lipebianc
FFF = Filter Forge Fan

|
Genious stuff!
I love this!!  (Note: example below had a bit of extra sharpness/levels adjustment on post-processing)
 "From the moment we are born, we start being filtered..." |
| Posted: March 6, 2013 5:16 am |
Details
E-Mail
|
|
SpaceRay
SpaceRay
|
Beautiful example of that beach, well done lipebianc
|
| Posted: March 6, 2013 5:39 am |
Details
E-Mail
|
|
Skybase
2D/3D Generalist

|
Filter's XY anchor needs to be changed to image bounds to accommodate images with different ratios. Current location of where the triangles rotate around is based on a 1:1 ratio (default settings).
|
| Posted: March 6, 2013 7:46 am |
Details
E-Mail
|
|
SpaceRay
SpaceRay
|
| Quote |
|---|
Skybase
Filter's XY anchor needs to be changed to image bounds to accommodate images with different ratios. |
Oh, YES!! you have solved one problem I found and I did not know why
I have followed your advice and changed the Rotate component and also the Free Gradient in the XY ANCHOR to "Image Bounds" setting and now it works right with rectangular images.
Thanks very much for the advice and correction
Please, Tim2501 change these settingings and upload again the filter to the library so you can keep getting the usage rank you deserve
Above I have already put this example (shown here again below) where the center of the color explosion is on the left side of the image and in not in the center
And changing those two components to "image bounds" it now shows the color explosion coming from the center of the rectangle. 
|
| Posted: March 6, 2013 8:52 am |
Details
E-Mail
|
|
Tim2501
|
Thanks for the feedback and the beautiful examples so far, the update is in queue 
I did not only fix the ancor, I even added the possibility to pick a custom center of the pattern, including preview mode, also blendmodes and opacity, and better brightness control.
Here are some examples to show the new possibilities of the updated filter:
This shows the new transparency and the new center-offset option
These two images show, how altering blendmodes can create totally different results.
The center of the effect in the second image is below the image bounds, making it much more directional. Looks almost surreal... |
| Posted: March 6, 2013 6:43 pm |
Details
E-Mail
|
|
SpaceRay
SpaceRay
|
Thanks for the update and good to know that you have added a center picking and not just the default one, even more controls, and good idea to have also blend modes.
Good examples you have put too
|
| Posted: March 6, 2013 11:38 pm |
Details
E-Mail
|