|
Messages 1 - 45 of 107
First | Prev. | 1 2 3 | Next | Last |
|
SpaceRay
|
In this thread I want to show a filter I have modified and I am making about this topic and some ways to be able to make your own Reaction Diffusion (RD) patterns with Photoshop and also using Filter Forge with a filter included in this thread that will let you mix photos with the created RD pattern and mix them.
For example this 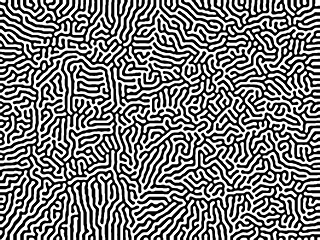
Click here for another good example of abstract example of RD texture Before continuing I want to give a big thanks to ddaydreams for having shown the awesome artworks of Fabian Oefner that made me research and look much more about this topic and also an even bigger thanks to Skybase that made the great and useful videotutorial Reaction Diffusion made on Photoshop, and told that these ones from the artworks of Fabian are based on this RD technique and also for having made the examples shown here and also shared and uploaded the FF filter that makes this possible and for uberzev for having shown it here too I have made a more a customized version and different version of Skybase FF filter with a image or photo based pattern maker that is available below I decided to start this new thread after ddaydreams suggested to make a filter here with Magnetic painting with Ferrofluid and watercolor and the beautiful and great results you could get. Click on photos to see them a little bigger. 


There is more information in the following websites: NEWS: Ferrofluid and water colors make for beautiful magnetic paintings NEWS2 even better: Fabian Oefner blows our mind with these spectacular watercolour and ferrofluid photographs Official website of the author FABIAN OEFNER REACTION DIFFUSION PATTERNS As told by Skybase, this beautiful artworks above are based on the Reaction Diffusion patterns textures as this example here or also and better as shown here on Google images and also described in the wikipedia and better is shown in this other website with more examples FILTER FORGE FILTER FOR MAKING BLACK AND WHITE AND COLOR REACTION DIFFUSION PATTERNS The filter is available in the second post below I have taken the Reaction Difffusion filter by Skybase here and as the this filter does not provide good results directly as needs more work and do not know how to do it, I have modified the source image and made a customized version of the filter that is photo based RD patterns, and you can make your own black and white patterns (as shown in the videotutorial below) or load a photo into FF, it can be a black and white or a color one, although not a very complex one and that has good lighting. Also I have added an additional way of mixing up to 3 different images or photos for up to 3 color sources, the main image loaded is the one that is converted into RD, and then on settings you can load another two to fill the RD lines. I have tried to make that the filter makes plain abstract patterns without a source image using filter forge components, but have not been able yet to do it. FILLING THE RD PATTERN WITH THE BEAUTIFUL COLORS SHOWN ABOVE IN FABIAN OEFNER ART Although with this filter you will only get a black and white patterns without any of the colorful and beautiful colors that are filling all the white parts of the pattern and showing the black parts as in the Fabian Oefner artworks, and it seems that is not an easy thing to do in Filter Forge if you do not want to fill and paint it manually as said by Skybase
PHOTO BASED REACTION DIFFUSION USING FILTER FORGE Although the examples made by Skybase shows a very simple abstract shapes without any specific shape, I have found another way to use exactly the same technique but using a photo based source to create reaction diffusion patterns The idea and inspiration to try this came from this website that shows a photo based reaction diffusion image as shown here below 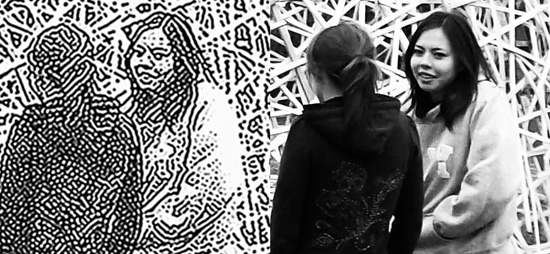
So to get this, is also very simple, you only load a photo into photoshop, it can be a black and white or a color one, although not a very complex one and that has good lighting, and then after go to the action panel and play many times (as shown in the video tutorial) until you convert the photo into a reaction diffusion pattern based on your photo and the use the unsharp mask as told above for final result. Here is an example of what you can do with the FF filter I have modified from the one from Skybase |
|||||||||||
| Posted: June 3, 2013 3:47 pm | ||||||||||||
|
SpaceRay
|
Here is the filter available to try it yourself, it is not finished yet, and I will keep improving it, I will not submit it to the the library, as it really belongs to Skybase as he has done most of the work, I just added some few things.
Also there is 10 presets to show a little of what can be done and want to make more things in another future better version REGRETABLY ONLY FOR FF 4.0 I have a bad news for many of you and is that Skybase made this filter in FF 4.0 and I do not know any way to copy it to convert it to FF 3.0, so this filter is regretably only for FF 4.0 I have tried to use the new Loop component but the problem is that you CAN´T use the blur component inside the loop, so is impossible to make this filter with the Loop component. THE GOOD NEWS IF YOU HAVE PHOTOSHOP If you do not have yet FF 4.0 or have not time left on your trial, and you have Photoshop, please keep reading as I have also made a further post to make this same RD patterns in Photoshop. Reaction_Difussion with Images.ffxml |
|||||||||||
| Posted: June 3, 2013 4:08 pm | ||||||||||||
|
SpaceRay
|
PHOTOSHOP TUTORIAL FOR MAKING BLACK AND WHITE REACTION DIFFUSION PATTERNS
Skybase has explained that to be able to make this yourself in Photoshop is very easy and fast by everyone without experience as shown in this very good, well done tutorial, easy to understand and follow Tutorial: Reaction-Diffusion in Photoshop by Skybase To get a good final output I have choosen to use to unblur the result, the "Unsharp Mask" filter with maximum amount of 500% and Radius 100 so you get a sharp and defined result. I have followed and made all as told in the video tutorial painting manualy lots of random white dots over black background and using the action that Skybase has told and got this texture shown here below  |
|||||||||||
| Posted: June 3, 2013 4:30 pm | ||||||||||||
|
SpaceRay
|
PHOTO BASED REACTION DIFFUSION USING PHOTOSHOP For filter forge version please look above
Although this tutorial above shows a very simple way to make this textures using white dots over a black background, I have found another way to use exactly the same Photoshop action that you have made when following the tutorial above to be able to use it also with photos instead of white dots to make shape based reaction diffusion patterns As I have already told above the idea came from this
So to get this, is also very simple, you only load a photo into photoshop, it can be a black and white or a color one, although not a very complex one and that has good lighting, and then after go to the action panel and play many times (as shown in the video tutorial) until you convert the photo into a reaction diffusion pattern based on your photo and the use the unsharp mask as told above for final result. Here is a photo from a tiger head instead of the white random dots and using the exactly same action and got this  |
|||||||||||
| Posted: June 3, 2013 4:37 pm | ||||||||||||
|
SpaceRay
|
And as in Photoshop you have layers, you can make the RD pattern from the photo AND then put the original photo in the layer above or below and mix it with the RD pattern using blend modes
For example here is the same tiger above but mixing it with original source photo using the Darker Color blend mode  |
|||||||||||
| Posted: June 3, 2013 4:42 pm | ||||||||||||
|
SpaceRay
|
And you can also create RD patterns that are made to fill a specific shape using photo and images with a transparent background, so the patterns will be only visible where there is pixels
Here is a heart shape made with flowers and then many times through the Skybase Reaction and diffusion photoshop action and got this |
|||||||||||
| Posted: June 3, 2013 4:50 pm | ||||||||||||
|
SpaceRay
|
And then adding the original source image to a layer above and use Darker Color blend mode and also adding an invert adjustment layer to invert the RD texture so the outlines fills the flowers shapes.
|
|||||||||||
| Posted: June 3, 2013 4:59 pm | ||||||||||||
|
SpaceRay
|
In photoshop to be able to change the settings you have to go the action you created and click on the step that you want to change the values and it will open so you change it. In filter forge is easier to change the settings
Photoshop version is much faster and gives perhaps better higher definition and better quality patterns than the filter forge version, but you can´t make the things of mixing images easily as I have already made possible using the filter I made here is another example of the Filter Forge version, this is preset 6 of the filter, that has a black pattern and transparent pattern so you can see the background image to show through. |
|||||||||||
| Posted: June 3, 2013 6:31 pm | ||||||||||||
|
SpaceRay
|
To be able to have more definition and smaller lines and so they are more accurate you have to reduce the size pixel settings, perhaps to half, depending of what you want.
IMPORTANT NOTE In the FF filter I have uploaded above you can´t use any transparent image as I have forgot to add an alpha component for when you load an image with transparent background, not always is this needed, but in this case is really needed because if you try to load the same heart shape made with flowers in this FF filter you get this shown below I will make a new version with this included |
|||||||||||
| Posted: June 3, 2013 6:42 pm | ||||||||||||
|
SpaceRay
|
Perhaps now that uberzev is back to the forum and he wants to keep filter forging he could have a possible suggestion and way to make something as shown in the first post shown here below
Of course if anyone else knows or could think of a way to be able to fill the RD shape inside the black parts will be also welcomed any suggestion and help. As I do not know any way to be able to fill the inside of the black pattern with colors that "flow" inside the shape, and could be using plain colors or using photo or image based colors. Probably is not easy at all, and should be better done filling the inside of the RD pattern manually instead. |
|||||||||||
| Posted: June 3, 2013 6:57 pm | ||||||||||||
Skybase
 |
Ferro fluids kinda have a more special property. There's a property of ferro fluids that provided a magnetic force in a certain direction, we get a repeating pattern of peaks and valleys. Nature typically wants to minimize the amount of total energy in a given system, and we can talk about efficiency all day long but I won't bother with that. A balance of that energy results in patterns. The effect is known as: normal-field instability. In this case the magnet you're shoving against the fluid = instability. The fun thing is when magnetic fields interact with very thin layers of fluids on smooth surfaces (glass), which is what the image displays above.
I'd go and make some ferro fluid using ink toners and vegetable oil for the joys of it. Take picts! Should do some scholarly reading: http://www.fbs.osaka-u.ac.jp/labs/sko...ew2010.pdf http://www.scholarpedia.org/article/G...ardt_model Thought I'd also try a more brute force example in Nodewerk. SpaceRay, you'd love Nodewerk. It's a lot more whack but it works. Has more whack tools. The interface is extensively complicated and so are parameter hookings. It's not easy as FilterForge. But do give it a shot. Method in screen shot below: Apply "melt" (reaction-diffusion node) to noise pattern for every iteration, pick a random position, fill the random position with a random color, multiply b/w image to ... tuck away problems. Either way tons of fun.  |
|||||||||||
| Posted: June 3, 2013 10:58 pm | ||||||||||||
| ddaydreams |
Spaceray. the Reaction_Difussion with Images ffxml file is now fast and awesome. I'll get much use out of it. It should be submitted to the filt library.
Thanks to you and Skybase:) |
|||||||||||
| Posted: June 4, 2013 12:18 pm | ||||||||||||
| ddaydreams |
|
|||||||||||
| Posted: June 4, 2013 12:21 pm | ||||||||||||
|
SpaceRay
|
Glad you like it and is helpful to you, is true that for me is awesome too, but do you think is fast? even a 600x600 takes some time in filter forge. As I have said above, I decided not to submit to the library because first thing is that most of the work is from Skybase, and I will not steal his work to be published in the library as my own, the changes made to the filter are slightly, and the last thing is that the filter is not finished and needs more polishing and work involved so it does work well and does not give any unexpected results |
|||||||||||
| Posted: June 4, 2013 2:36 pm | ||||||||||||
|
SpaceRay
|
ddaydreams my answer to you is in the post above here
Are you going to try to make your own ferrofluid artworks ? Cool, yes, if you can and know how to do it, and more important, have the elements to do it, would be interesting what you can do.
Thanks very much, I have never tried it and have just downloaded it and it looks cool and interesting, BUT as you say this is extensively complicated and has a huge amount of different components and the way it works with components and parameters is not in any way as in FF and surely not as easy as FF, and there seems that there is no manual or help guide to know what all those lots of nodes do and how to use them and how to combine them. It seems that you already know very well how to use it and have done that awesome work of including color inside the reaction diffusion pattern 
Amazing what you have done here, I was going to ask how you have done this, but I have seen in the nodewerk forum that you lost this file, although something can be seen, will try to make something. |
|||||||||||
| Posted: June 4, 2013 2:47 pm | ||||||||||||
| ddaydreams |
Please let me know if you update it again and post the new ffxml in this thread. |
|||||||||||
| Posted: June 4, 2013 5:17 pm | ||||||||||||
|
SpaceRay
|
Yes, I will do it, as I have to try some things and see how I can make it better and also see how you can feed into the filter specially made image source to get specific results, because I have seen that some source images that work well in photoshop does not work at all in the same way in the FF filter, although is using the same technique in both of them, and still do not know why. |
|||||||||||
| Posted: June 4, 2013 6:26 pm | ||||||||||||
|
Skybase
|
We have a couple options in terms of making it "better":
1. Reduce the number of iterations and make it run faster (... makes a really boring filter.) 2. or increase the number of iterations to fill up consequent gaps that occur on larger images (images over 600x600). The demo I made was never designed beyond usage with 600x600. That's a problem solvable by adding calculation time. 2.5. Reduce the radius of the blur and highpass attributes and increase number of iterations. (Image based inputs would be happier with smaller radi, also if your input is a grayscale brightness image it'll help.) 3. OR we can settle on a reasonable number of iterations, and fill the consequent empty spots with a reasonable noise pattern to fill up the initial pattern. That way, when the iterations increase, it won't leave giant empty spaces where the reaction-diffusion didn't happen. Consequently, this method takes away from the image's appearance which is why I didn't do it. 4. Use a different method of reaction-diffusion all together. (see image below) At the point that we're using blur+highpass chains we're already adding crazy loads of calculation time. 5. I actually want to make myself a simple Gaussian blur script in lua (because why not.)  |
|||||||||||
| Posted: June 4, 2013 10:10 pm | ||||||||||||
|
Indigo Ray
|
Oh, I have something like this using derivatives and blurs. Not the same, but much faster. Tweak those blur radii!
Derivative Dots.ffxml |
|||||||||||
| Posted: June 5, 2013 8:47 am | ||||||||||||
|
Skybase
|
Oh man that's certainly faster. By the way, did you follow any specific algorithm or was that algorithm made up? It makes pretty patterns.
|
|||||||||||
| Posted: June 5, 2013 9:29 am | ||||||||||||
|
SpaceRay
|
Cool, although is not the same effect, and you can´t control it much, but is good anyway, and I have discovered a slightly different setting that I like more to apply dots texturing by just modifying one blend mode. This dots texture is like light going through a thick straw roof that is over the image Here is the slightly modified version with 3 presets. Derivative Dots Lighten.ffxml |
|||||||||||
| Posted: June 5, 2013 5:59 pm | ||||||||||||
|
SpaceRay
|
Here is the Photoshop action that Skybase have told in the video tutorial
As already told above, you can click on each of the three components of the action to change the settings and values IMPORTANT THIS IS NOT A FILTER FORGE FILTER You have to change the .ffxml extension to .atn to use it in Photoshop Reaction Diffusion Patterns by Skybase.ffxml |
|||||||||||
| Posted: June 5, 2013 6:27 pm | ||||||||||||
|
SpaceRay
|
I have found this in one of uberzev´s projects and think is cool how he has made the shapes filled with differents colors fr om this thread here

although is not known HOW uberzev has made it, perhaps this could be used to fill the reaction-diffusion pattern with colors in similar way.
1 - Is true that this is no good and would loose the effect 2 - Increasing the number iterations would be good for a better effect and the only bad thing is that it would be slower to render, although this is good, this is the easiest way and perhaps there could be a better way to have a faster way. 2.5 and 3 - good possible alternatives that needs to be tested 4 - I agree that would perhaps be good to find an alternative method of doing the reaction diffusion that would not add loads of time to the render with the iterations 5 - OH YES! I have not thought of it. Would be really possible to make a script that could make something similar without using the combination of slow components in FF? I think that this would be really the best possible alternative to bypass the render speed and make it maybe faster. PHOTOSHOP IMAGE TEXTURE BASE TO MAKE REACTION DIFFUSION I have just found an interesting, easy, automatic and good way to make abstract and well done reaction-diffusion patterns WITHOUT having to paint yourself dots or anything or use a photo as source, and this is using an action I have found that is already included in Photoshop by default. 1 - Open Photoshop, go to File--> New... and then make a new blank document with whatever resolution you want that the final result will have. Be aware that the size will be doubled by the width of the image, the height will keep the same. After making the new white document, 2 - go to the actions menu and on the top right 3 - click to open the actions menu, 4 - then click on the Textures and then this set of already made actions will be available 5 - search this new texture folder and open it by clicking on the triangle 6 - Click on the Ink Blots action 7 - Click on Play This will render a beautiful and interesting texture of random generated black ink shapes 8 - After this ends go to your Reaction-Diffusion action and begin to click play until you reach to a full screen reaction diffusion pattern that you are satisfied with. If you did not like the original texture of the Ink Blobs action, you can change it modifying some of the key settings inside the action. And that is all Here below I show you wh ere in Photoshop is all this  |
|||||||||||
| Posted: June 9, 2013 5:30 pm | ||||||||||||
|
Skybase
|
Alright, I gave the color thing a shot.
 |
|||||||||||
| Posted: June 10, 2013 5:53 am | ||||||||||||
|
Skybase
|
... a couple improvements.
 |
|||||||||||
| Posted: June 10, 2013 12:36 pm | ||||||||||||
|
SpaceRay
|
Good one, I would have to see another example to make a good opinion, as I am not sure what to say just looking at this one, as I do not know if the colors are defined and enclosed into the reaction diffusion pattern
This looks good and well done, and I like it, but this not completely reaction diffusion texture as it has many parts that are according the original shape and not following the reactiopn diffussion pattern, but as I said is a good and nice alternative of idea. |
|||||||||||
| Posted: June 11, 2013 5:54 am | ||||||||||||
|
Skybase
|
Aye, you should give a shot as well! I basically gave you the basic filter, a simple Photoshop tutorial, some advanced reading (not required), and a couple more ideas. Provided a bit more research, some experimentation and some time... I think you got the potential to make something cool. The goal you set for "coloring-each-cell" is honestly a bit too high at your level, but I think you can do the more smaller goals, like come up with a different method of reaction diffusion. (It doesn't have to rely on the way I did it at all since reaction-diffusion is just a concept of natural organization.)
I'll just continue posting methods and ideas here anyway and whatever I end up with. It's always fun making new things but if you need further help understanding and likewise constructing the filter or more example methods, I can always go about making them. I really don't have issues spending time on this type of project. I quite need the filter for my own projects anyway. So yeah... give it a shot. --- Notes: The current appearance is due to the lack of iteration counts. I simply didn't like the wait times so the iteration count for those examples were set to 6 or something. If you want really fluid looking ones we need at least 50 iterations. |
|||||||||||
| Posted: June 11, 2013 6:30 am | ||||||||||||
|
Skybase
|
Tried highpass --> median and threshold at the very end. Looks like a bunch of artifacts got in. I thought I'd try more iterations but it goes pretty slow.
I call this one not so interesting.  |
|||||||||||
| Posted: June 15, 2013 5:10 am | ||||||||||||
|
Skybase
|
Alright, new method. Inspired by Indigo Ray but extremely simplified.
This method is actually ridiculously fast (still takes 3 minutes, but faster than the previous attempts). Method: 1. Blur 2. Get derivative 3. Go to 1. The results are smooth and directed towards a given angle. (We can probably randomize the angles for fun).  |
|||||||||||
| Posted: June 15, 2013 5:32 am | ||||||||||||
|
Skybase
|
Ok.. more randomization.... (Same method as above) excepting derivative gets angle from the source image (gets messy if source is noisy).
Time = around 2 minutes for 9 iterations.  |
|||||||||||
| Posted: June 15, 2013 5:44 am | ||||||||||||
|
Skybase
|
And with an image.
 |
|||||||||||
| Posted: June 15, 2013 5:57 am | ||||||||||||
ThreeDee
 |
Looking good!
|
|||||||||||
| Posted: June 15, 2013 10:02 am | ||||||||||||
|
Skybase
|
Thanks! I don't know if I'll ever submit this filter to the library due to its epic sluggishness but its certainly faster than the other attempts.
Here's a really thin version of it. Image = the tree default image. Took like 3 minutes to render.  |
|||||||||||
| Posted: June 15, 2013 12:09 pm | ||||||||||||
|
SpaceRay
|
Please, can you clarify if these iterations are done with the new Loop component or they are done without it by just repeating copying and pasting the group of components to get the iterations? Because as I have tried and as far as I know you can´t use Blur, Sharpen or HighPass inside a loop I have seen that is true that to get nice and well done fluid and good reaction diffusion pattern you need a lot of iterations, because when you use the Photoshop method you have to click many times to the play button until getting something good, and could be up to 40 or 50 times.
From this I think and suposse that this means that it takes 2 minutes to make a 600x600 result and that you are not using the loop component and just copying, pasting and linking 9 groups of components to get 9 iterations.
Yes, thanks, I will try to make something with it and see what I can do and get, although the problem is that for making this is a slow thing, (I mean that FF takes too much time to make this kind of things and to make a research about it and I get frustrated and desperate with it), although anyway I will try.
Yes, I would never find and know how to fill and color these patterns BUT as you say well, I could find alternative and different methods of making reaction diffusion patterns as NOT ALL of them are only based on the way you described as I have made a google search and there are some different ways to do it.
Thanks for trying and helping here, it would be good to see what you can do and the things you can find and end up with. and as said above I will give a shot and see what I can do. |
|||||||||||
| Posted: June 16, 2013 4:50 pm | ||||||||||||
|
Skybase
|
Right, none of these utilize the loop component and as you named it, it can't anyway. So they're just groups copied and pasted over and over.
Iteration = 1 copy of a group. In terms of these experiments I decided to go for faster results than proper ones so methods described here are generally rougher. In this thread there are 2 experiments that I listed that kinda work and don't. I'd say it's way too sluggish for a former release for the library. But yeah, give otherwise a shot. You probably already know this but I'll leave definitions here anyway. Minimum number of nodes necessary to establish 1 reaction-diffusion is 2 nodes. Diffusion: anything that distorts, blurs, fluffs up an image. Reaction: anything that brings clarity to an image. |
|||||||||||
| Posted: June 17, 2013 5:10 am | ||||||||||||
|
SpaceRay
|
This is what I have thought after seeing how you built the FF filter Thanks for your help and tips and I will try and see what I can do and what kind of reaction diffusion experiments I can do. |
|||||||||||
| Posted: June 17, 2013 6:12 pm | ||||||||||||
|
Indigo Ray
|
Ok Skybase, I made a new method inspired by you inspired by me
It's just what you said, but I did the derivative first. Actually I have two chains at right angles, then blended together at the end. Much faster than yours, but it looks square-ish.  |
|||||||||||
| Posted: June 17, 2013 9:05 pm | ||||||||||||
|
Indigo Ray
|
But wait...what if I take the angular derivatives based on the gradient angle of the source image...
 |
|||||||||||
| Posted: June 17, 2013 9:15 pm | ||||||||||||
|
Indigo Ray
|
Ooh, perpendicular angle on the lifesaver...
 |
|||||||||||
| Posted: June 17, 2013 9:20 pm | ||||||||||||
|
Indigo Ray
|
 |
|||||||||||
| Posted: June 17, 2013 9:26 pm | ||||||||||||
| ddaydreams |
Indigo Ray,I like the the look of the last 2 pix you posted
Skybase I like the last 4 pix you posted very interesting |
|||||||||||
| Posted: June 18, 2013 12:38 am | ||||||||||||
|
Skybase
|
Nice! I think we just need to figure out how to get this thing to run at a nicer rate.
How many iterations do you go through for the results? |
|||||||||||
| Posted: June 18, 2013 3:16 am | ||||||||||||
|
Indigo Ray
|
Only 6 iterations, renders for me in 15+ seconds. 12 iterations takes ~1 minute.
|
|||||||||||
| Posted: June 21, 2013 9:10 am | ||||||||||||
|
SpaceRay
|
Indigo Ray I like the last one one you have done with color, and I wonder if you have used separated color channels as it happens in the Harris Shutter effect or like the FF filter Harris Shutter Effect by Morgantao
I have been looking other different ways to make this reaction diffusion and now will try it, meanwhile I have made another good discovery reducing much the size slider setting and got this nice texture over the built in FF Ladybug This below is done with the filter I have already uploaded above here, see the settings here |
|||||||||||
| Posted: June 22, 2013 3:43 am | ||||||||||||
|
SpaceRay
|
And now I have the idea to take this Reaction Diffusion pattern to be as source to others FF Filters like for example Mercurial by Garbanzo and got this result below
|
|||||||||||
| Posted: June 22, 2013 4:25 am | ||||||||||||
Messages 1 - 45 of 107
First | Prev. | 1 2 3 | Next | Last
Join Our Community!
Filter Forge has a thriving, vibrant, knowledgeable user community. Feel free to join us and have fun!
33,820 Registered Users
+14 new in 30 days!
153,732 Posts
+17 new in 30 days!
15,381 Topics
+5 new in 30 days!
Online Users Last minute:
22 unregistered users.
Recent Forum Posts:
- Guide on how to use texture maps PBR export with Filter Forge for 3D by SpaceRay
June 24, 2026 - PBR work flow...? by SpaceRay
June 24, 2026 - Chaos Fields by Ramlyn
June 21, 2026 - Unleashing creativity art with the help of filter forge 11 by EAdams
June 14, 2026 - FF 11 and FF 12 Studio animations that could maybe be done I think by CFandM
June 8, 2026 - BB - BubbleBlocks by Ramlyn by Ramlyn
June 2, 2026 - Dragon Distort II by Wolfgang Halder by Wolfgang Halder
June 1, 2026 - Multi Refraction by aaron Harris by SpaceRay
June 1, 2026 - Flashing Messages 3x6 by Rachel Duim by SpaceRay
May 28, 2026 - New awesome TEXT component FF 14 - How to get the most of it? by SpaceRay
May 28, 2026 - Just dropping in to say by Rachel Duim
May 24, 2026 - Veggie Rock by Vanblam by dactilardesign
May 22, 2026